
When a photographer first picks up a camera to learn photography, their first goal is to capture a decent well-exposed well-focused image. As far as focusing is concerned, well, that’s taken care of pretty nicely by the modern day DSLR. It’s the good exposure that can sometimes tend to be a challenge. As a photographer, the three primary tools that you’ll have to use to get a decently exposed image are Shutter Speed, Aperture (measured by f-stop) and ISO. These three as the so called three elements of the exposure triangle. Refer to these links to understand their basics – What is Shutter Speed and What is f-stop or f-number or f-ratio.
In this article I’ll tell you in details about ISO. But the other two are equally important, if not more. Go through these links to understand their concepts in details – How to use Shutter Speed and How to use f-stop. Also don’t forget to take a look at this article that mentions about the relationship between these three factors – Relationship between f-number, Shutter Speed and ISO.
Various aspects of ISO
To understand the details of ISO, first you need to understand its basics. Go through this link to understand, What is ISO. Now that you’ve understood that ISO setting is a measurement of the sensitivity of your camera sensor, and is basically used to brighten up an image, let’s take a look at its various aspects.
First let me tell you where all in your camera you can see ISO and how it’s displayed.
Where is ISO displayed in a Camera
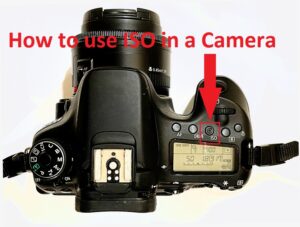
Just like Shutter Speed and f-stop, ISO is also displayed at three places in most cameras. You’ll find it displayed on the top of your camera, on the front screen and through the viewfinder. Take a look at these pictures to understand where all you can spot ISO in your camera.
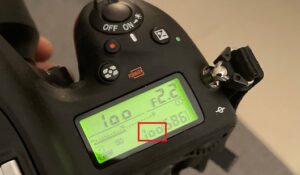
Top of Camera
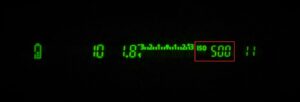
ISO displayed in Viewfinder
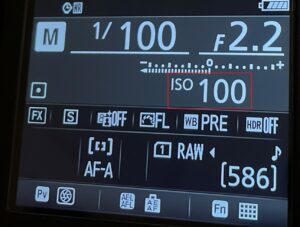
Front Screen of a Camera
Next, let’s take a look at, how is ISO displayed in a camera. In other words, what is the format in which ISO is displayed.
ISO display format in a Camera
In most entry and mid-level cameras the lowest ISO value is 100. The lowest ISO is also called the ‘Base ISO’. In professional grade cameras, you’ll see ISO values available to be set even below 100. For example, in a Nikon D750, if you scroll the ISO value below 100, you’ll find Lo1, Lo0.7 and Lo0.3. When you scroll to increase the ISO value above 100, the available step-up values are – 125, 160, 200, 250, 320, 400, 500, 640, 800, 1000, followed by multiples of 10 of these values.
There is also the provision to set your ISO setting to auto mode, which isn’t advisable. You should always keep a control on your ISO and not let the camera choose it. That’s because the camera has an innate tendency to increase the ISO whenever there is less ambient light. And you shouldn’t set the ISO to a high value. Why you shouldn’t, is something that we’ll discuss later in this article.
Now, let’s take a look at how you can change the ISO in your camera.
How to adjust ISO in a Camera
Now that you have understood where you can find ISO on your camera and what your available values are, let me show you how you can adjust it. I have demonstrated the process using cameras from two leading brands – Canon and Nikon.
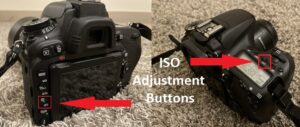
In most cameras, you’ll find a dedicated button for ISO. In order to change the ISO, this button has to be pressed down and simultaneously one of the scroll wheels on the camera body has to be rotated. Refer to these pictures below to see how the ISO button looks like.
For cameras that don’t have a dedicated ISO button, you’ll have to change the ISO setting from the Menu. Refer to these pictures to take a look at an example.
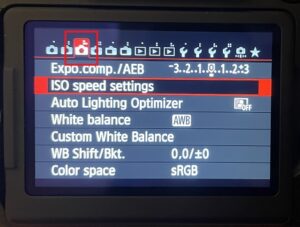
1. Navigate to the Menu option that is to set the ISO (you may have to look for it a little)
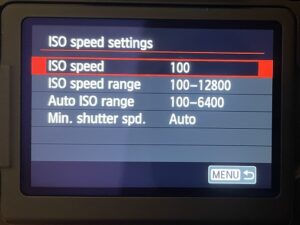
2. Choose the option by pressing ‘OK’
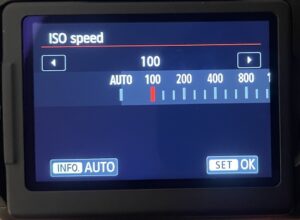
3. Use the left/right button or the scroll wheel to set the ISO that you want
Hope, by now you’ve understood how you can modify the ISO setting on your camera. Now, let’s take a look at how you can use it to take the image that you are looking for.
How to use ISO for a Better Picture
ISO is that setting in your camera that will come to your rescue when Shutter Speed and f-stop cannot provide you with the exposure that you’re looking for. Surely, it isn’t the best tool that you have to enhance brightness but it’s a handy one, and here’s why.
Let’s say that you’re trying to take a picture in a condition where the available light is not enough for that particular shot. Why I stress on the word ‘particular’ is because a lighting condition that’s perfectly fine for a landscape shot may not be sufficient enough for capturing a bird in flight. That’s because, to click a bird in flight or any object in motion for that matter, you’ll need a high Shutter Speed. And at that high Shutter Speed your picture will not have enough brightness. So, in order to address the situation you’ll start lowering your f-stop (only if you’re okay to get your background blurrier). But, you can only lower your f-stop to a certain value. If reducing the f-stop gives you enough light to let you choose the Shutter Speed that’s needed, then it’s all good.
But, what if, that’s not enough? What if, the lowest f-stop isn’t also giving you the brightness that you’re looking for? That is when the ISO factor will come handy. Increase your ISO by small steps until you achieve the desired brightness of your frame. But then you may ask me, ‘Why can’t I just start with a high ISO and not go through all this?’. That is a very valid question and here’s the answer.
Disadvantages of using a high ISO
This is something that I have mentioned above as well. We should always try to use as low an ISO as possible. The reason is that, when you increase your ISO, at every step you are introducing something called as ‘Noise’. If you don’t know what noise is, you may be confused, because we normally relate noise with sound. But, there is also something called as image noise. Check out this link that talks about What is Noise in Photography. Unless a photographer purposely wants to add noise to their image for creativity, they’d always want their shot to have as less noise as possible to achieve a clean image. So, higher the ISO, more noisy and unclean the picture will be.
That brings us to the end of this article. Hope you learnt what you were looking for.
If you have any feedback or suggestion for us, please do leave us a comment or write to us (Contact Us). Also, don’t forget to check out our Guides section that has loads of such informative knowledge waiting to be grasped.
Thank you for visiting Shutter Facts… Happy clicking!

Zoheb is a professional photographer with a wide range of experience in various genres of photography. While undertaking his Engineering degree in Applied Physics, Zoheb was fascinated by the Camera. After graduating in 2008 and joining an IT firm at the age of 25, he found his interest in photography grow exponentially soon after he bought his first entry-level DSLR, a Canon 1000D. Since then it has been a long journey of experience and learning through self-teaching. Shutter Facts is an attempt of Zoheb to pass on that knowledge to the world in the simplest possible manner, so that learning photography doesn’t seem so difficult as it is generally portrayed.